This is the 6th of eight Factory tour blogs of
the New Taipei City area. We were
escorted on a bus by K. G. L. AD. Media Agency International Company’s
associates, Director, Kelin Chen, and Account Executive, Ann Li, to Glastory
Factory Tour. This tour was definitely
one of my favorites, and I would love to go back again and learn even more
about Glass Design processes.

I have loved all kinds of glass since I was very young. As a child, I collected glass “soda pop”
bottles to get the 2 cent deposit to buy candy at my favorite childhood
store.
 | |
| Examples of old "Soda Pop" bottles from the 1950's to 1970's era |
Later, I became fascinated by
colored glass marbles, and we played marbles in the dirt and sand for many
years. Back in the the 1950's to 1960's you could buy a bag of marbles (about 10-12 marbles) for under ten cents ($0.10 US) I had many favorite marbles I
kept as “shooters” but would never play for, or trade these prize possessions,
just my more common marbles. I only wish
I saved them as I grew older. The simple game we played is as follows:
1. Draw a circle about 2 ft to 3ft. in diameter in the hard sand or dirt.
2. Randomly drop 2 or 3 of each players marbles in the center of the circle.
3. Players take turns. You put the "shooter" marble between your first index finger (curled to hold the marble) and your thumb. Aim at the marble you want to hit, and "flick your thumb".
4. If you knock a marble out of the circle, you get to keep it.
5. You can shoot again if your "shooter" marble stays inside the ring.
6. If your "shooter" marble goes outside the ring, your turn is over.
 |
| Glass "marbles" Photo Courtesy of Wikipedia |
As a young adult in my 20’s, I remember walking the shores
of the Oregon pacific coast picking up so many color fragments of glass that
were tumbled by the sandy ocean bottoms of the Pacific into somewhat smooth
surfaces from. These glass fragments can
come from many sources from: broken glass ware and bottles thrown overboard by
ships; damaged glass from age old ship wrecks; pieces of glass buoys from
Japan; and many other sources. I still
have a small box full of these little gems that I have kept for several decades.
 |
| Examples of tumbled ocean/sea glass you can find - Photo courtesy of Wikipedia |
Years later, I started collecting some US antique iridescent
glassware from the late 19th and early 20th century. This was a lot of fun searching antique shops
all around the US, but the prize items were then beyond my budget. In the 1980’s and 1990’s. The photo below is similar to one of the
bowls that I own.
 |
| Iridescent Antique/vintage Glass Bowl - Courtesy of etsy |
I stumbled across solid blown glass spheres designed by
glass artists in the West Coast representing our solar system planets and stars
around the universe. I never finished
this collection from my favorite artist when he moved on to new glass designs.
But I have seven of them including the Sun and Earth. (when I am back in the US, I will add actual pictures of my "planets".
 |
| Glass "Planet" sphere - Photo Courtesy of glassrave |
My fascination with glass intrigued my ex-wife when we went
to arts & craft shows, artist studios & galleries, as well as fine gift
shops around the US. (Remember, I have traveled to hundreds of cities in all 50
US states.) She decided she wanted to
get first into stained glass. She then
decided that making glass jewelry from fusing the colorful array of dichroic
glass in small “beehive” glass kilns was her passion.
 |
| Small "BeeHive" kiln - Photo Courtesy of clay-king |
 |
| Samples of Textured dichroic glass - Phot Courtesy of dichroic and more |
 |
| Example of range of bright colors from fused strips of dichroic glass - Photo Courtesy of spraygraphic |
But, she quickly got bored from both and then wanted larger
kilns to “slump” glass and make custom dinnerware, bowls, and much more. Two years, 5 different size kilns, and
thousands of dollars of glass later, she got bored of it all. Examples of similar kilns are below:


Needless to say after that expensive investment in futility, my interest
for glass faded somewhat for a period of time. However, since then, I have added
some very wonderful glass items to my collection, but my
trip to the Glastory Factory tour really brought back the excitement and passion I
have for artistic glass designs.
Now let’s talk
Glastory!
 |
| Glass Art on the Floor as you enter |
 |
| Lobby Display Cases |
 |
| More displays near the lobby |
From the moment I walked into this factory tour, I knew I
was in for something special. Everywhere
the eye could roam, there were objects of glass and glass art. The small, but comfortable lobby had a number
of fine cast glass objects, but one only had to look on the floor, doors, walls
and more to see the craftmanship of Glastory.
Even as I walked into the bathroom, there was glass in the door, glass
wash basins, glass sliding cabinet doors, and more.
 |
On the door of the bathrooms
|
 |
| More Glass In the Men's Room |
After a brief introduction in the lobby area by our tour
guide, we next walked into a room to learn more about glass fundamentals.
 |
| Our Tour Begins |
First, the composition of glass as described
in the image below. They also had
display cases of powdered materials, compounds, etc., used in the coloring of
glass. In one corner was an old brick
kiln once used for blown glass.


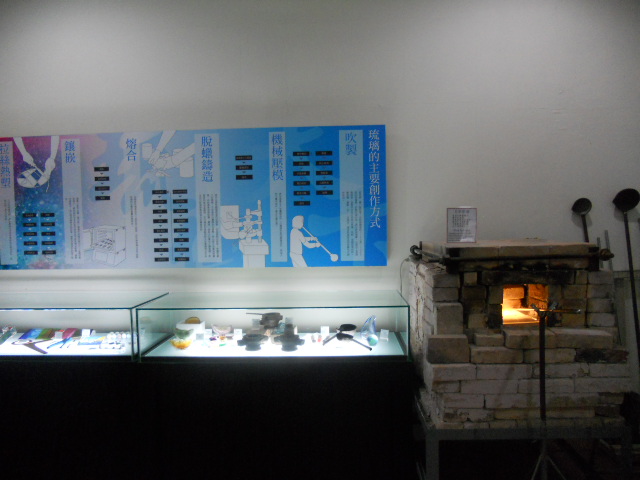 |
| Blown Glass Process; Glass samples & materials; a sample "Glory Hole furnace |
 |
| Ingredients for making various colors of glass |
Scattered around the room were various glass art objects, including
spheres representing the planets of our solar system……cool!


In another room we learned about the steps used to make high
quality cast glass art objects as described in the image below.

I never really knew how difficult it is to
make such fine glass art objects, but after seeing many Taiwan designers over
the years, the Glastory is certainly high quality, and very collectable art
objects.


There are many small rooms in this factory, including a
showroom with wonderfully beautiful glass work in show cases around the room.


Some Background
Blown glass dates back to the last last century BC and Early
AD. It became more popular in ancient
Greece and then Roman Empire. The Phoenician glass workers began refining the
technology and they spread it around the Roman Empire and it flourished into
the Middle Ages and the Renaissance period after the fall of the Roman Empire
in the 5th century AD. The Venetian
glassworkers from Murano continued to produce fine blown glassware and blown
glass quickly spread the world into China, Japan and though out the Far East.
To produce blown glass requires three (3) separate furnaces.
Furnace number one is used for the molten glass in some type of crucible. The next furnace is an open furnace and is
used to reheat the glass being blown in between steps of working and shaping
the glass. This furnace is often refered to as the “glory hole” furnace. The last furnace required is for the final
cooling stage and is referred to as the "annealer" furnace. This furnace is needed to cool the glass very
slowly over a period of time such a few
hours to a few days. Larger pieces of glass required a longer and slower
annealing period to make sure the glass does not crack due to thermal stresses
in the glass.
There are many tools involved in glass blowing and the blow
pipe is the first and most important. This
is used to attached the first “blob:” of molten glass. One end of the blowpipe is initially
preheated in a furnace and then dipped into the crucible of molten glass in the
first furnace. Other important tools
include the workers bench for rolling the blow pipe and working the molten
glass; various paddles, and wet piles of paper to hand shape and mix the added
glass to the glasswork; wood knives, various types of shears for cutting adding
shape to the work, etc.. To add color in
precise areas of the work, rods of glass can be added to the glasswork as the
blow pipe is rolled on the bench. Other
random colors can be added from chips of single or multi-colored glass by
dipping the molten glasswork into piles of the colored glass chips.
At the beginning of each step, air is blown into the pipe,
creating a bubble inside the molten glass and this creates a larger piece after
each blowing. The various tools listed
above (and others) are used to shape and cool the glasswork piece in the early
steps of creation. The shears and
related tools are used to near the end of the process to cut the glass, remove
glass and to work the item into it’s near final shape. After each step of adding glass,
shaping/cooling the glasswork and adding (colored)glass, the glasswork is
placed into the second “glory hole” furnace for only several moments to bring
the piece back to the working temperature.
I will not spend more time discussing the many process
steps, to create the final glass size, shape and design, but once the glasswork
is transferred to the “punty” or stainless steel rod it can then be placed into
the final “annealing” furnace to cool the item into the final design.
Back To Glastory
We next went to see a demonstration of blown glass.
We sat in an auditorium watching our two glass workers go
though the entire process of creating a small vase from blown glass. The following photos show just a few of the
steps in our demonstration.
 |
| The Demonstration Area |
 |
| The Demo begins |
 |
| First get the molten glass on the blow pipe from crucible in the first furnace |
 |
| Showing how the blow pipe can quickly expand the glass |
 |
| Using tools to shape the glass "blob" |
 |
| Reaching for the wet paper to slightly cool the glass and to shape it |
 |
| Dipping the molten glass into colored chips of glass |
 |
| Adding colored glass from a molten glass rod |
 |
| The "Glory Hole" furnace to reheat after adding material and color |
 |
| After cutting one end open, using tools to shape the top of the vase |
 |
| Precise hand movements to add irregular shape to the top of the vase |

 |
| Last shaping of the vase before annealing |
After our demo, we had a chance to browse thru several other
glass show rooms and to admire the many different items on display.


One small area near the back of the building was dedicated
to very fine glass lampwork. Lampworking
is widely used to make colorful glass beads in many shapes and sizes. It is also used by artists to create small
glass designs such as flowers, animals, fish, figurines, trinkets, Christmas
tree ornaments, and much more.
 |
| Lampwork pieces just finished |

Lampworking is performed by taking small rods of glass in
various diameters, lengths and colors.
These rods are heated by a small precision torch (also known as a lamp)
and as the tip of the glass rod heated to a molten state, it is added to the
glasswork design. Tools and precise hand
movements are used by the artist to create the lampwork design.
Our DIY project at the Glastory was to add small chips of
colored glass to a small square clear drinking glass to make a design. We only used glue to adhere the colored glass
chips, so this momento of the Glastory is really for display only.
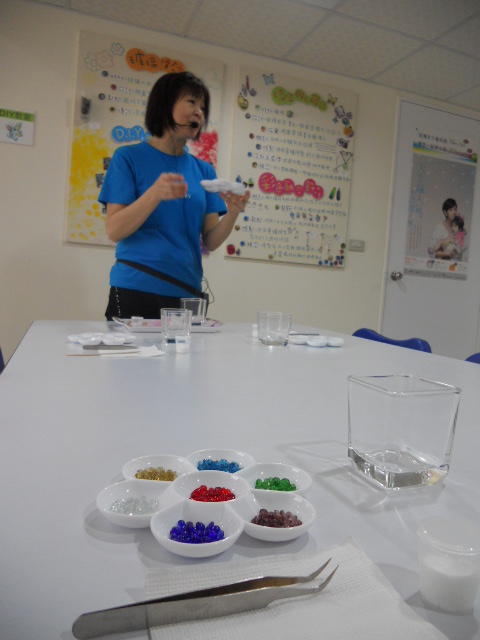 |
| Our Tour Guide explaining the DIY Project |

Our Tour Ends
I loved so many of these glass art objects that I actually
bought a glass sphere to add to my collection of “planets” back in the US.
You really have to go to the Glastory to see these glass
professionals turn molten glass into works of art. You can contact or visit the Glastory with
the following information:
GLASTORY
ARTS CENTER
No. 1- 7,
Kouhuzi, Danshui District,
New T aipei
City 251, Taiwan (R.O.C.)
Tel: +886 2
26256972
http://www.glastory.com
Edward C.